Putting a glowing emblem on your car
*please note this will not work for all cars, your car must have an emblem located in the middle of the grille... it may be possible with other sorts of emblems, but I've never done them and you'll have to figure them out for yourself... The only cars I HAVE done this on are a 1998 Mazda 626 LX and a 1995 Toyota Camry.
While the install on the Camry was more simple than on the Mazda, I only have the Mazda documented with pictures, so I will use that as the example... either way, this operation isn't difficult and shouldn't take you more than an hour or two to do, especially if you're slightly mechanically and electronically inclined.
First thing's first, each glowing emblem is made up of 2 main parts, the grille, and the glowing assembly... the glowing assembly is essentially a piece of 1/4" lexan (but plexi will work) prepped in a particular way that I'll walk you through.
You need to decide how you're going to fit your lexan piece behind your emblem. This is the most complicated part of the entire modification. With the 626, it was rather difficult, the grille consists of 2 separate pieces, a chrome outer ring with the actual emblem, and a black plastic inner piece with the actual slats. The easiest way to go about putting lexan behind the emblem, but in front of the black backing was to mesh the grille. I got an already meshed grille from a friend. He had cut all the slats out of the grille so just the outside ring of the backing piece was left (this needs to stay because it's where the mounting points are). Then he cut a piece of mesh to shape and just inserted it in between the outer ring and the inner piece and bolted it back together... the mesh can't cover the emblem's hole itself. Sounds simple enough right? Paint the mesh a pretty color... most folks seem to like flat black, and while you're at it, rough up the chromed grille ring and paint it some other color too... I'd personally suggest the color of your car... unless you like it chrome, it doesn't really matter.
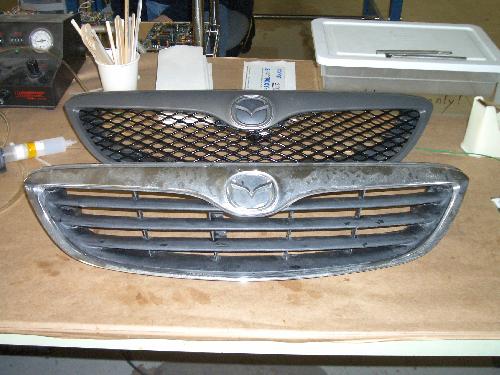
Just so you get the idea, here is a picture of the mesh grille (back) and the original slatted grille (front)
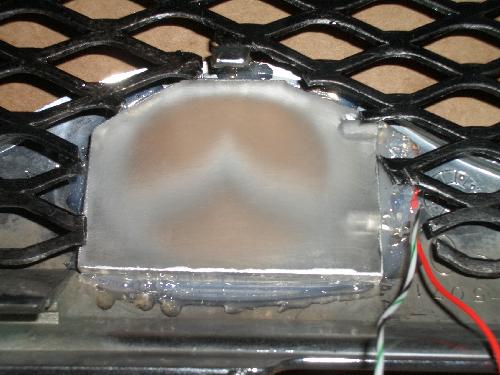
Anyway, the lexan piece will be cut to shape to fit behind the emblem with a little extra space off to at least one side to house the LEDs you will be using, but enough to keep them out of view. In my case, I found it most convenient to put them off to the side rather than on the top or bottom. So, obviously, you're going to want to cut the piece of lexan (or plexi) to shape. I found a bandsaw to be the most useful device for this.
Here's a picture of how I decided to fit mine in between the meshing. Ignore the LEDs and wires and glue, we haven't gotten that far yet.
The Camry was much easier to do all this fitting with... I didn't need to mesh the grille at all, the emblem itself actually had a nice round hole behind it (with a gap at the bottom) and the emblem itself just unscrewed from the grille... So, I traced the emblem and cut it out in a circular fashion, leaving room on the bottom for the LEDs.
Once the emblem was cut to shape, I chose what color LEDs I wanted to use... I chose blue for the Mazda and red for the Camry. I only used 2 for each emblem, but in retrospect, I should have used more for the Camry, as it's a larger emblem.
I scratched up the back side of the lexan with sandpaper... be careful not to make it too uniform, if it is, it won't catch light very well... just sand in circles like you're waxing a very tiny car. After that is scuffed up enough so that when you look through the front of it, you can't see through it anymore, drill holes the size of your LEDs in the side of the lexan at the spot you left for the LEDs to fit in (duh). Insert the LEDs into the holes and glue them in place. I used 5-minute Epoxy.
After that, I used a q-tip to paint Silver paint around the outside edge of the lexan piece. This will make the light reflect a little bit better, and also will help keep the light from spilling out around the emblem. I've seen a couple other people try to mimick my glowing emblem, and this is the step they always leave out.
At this point, you'll need a little math to decide what size resister you're going to need for this job. This is done with a mathmatic formula known as Ohm's Law, which looks like this:
E = i x r
Of course we all know (yeah, right) that this means the Voltage is equal to the current multiplied by the resistance. I'm going to simplify that, since we didn't all just finish High School and I'm sure algebra isn't fresh in any of our minds.
Lets assume that your car is run on a 12 volt power supply, since this is the year 2005 (at least it is when I'm writing this) and most of our cars do. This is going to be the starting point for finding our resistor value.
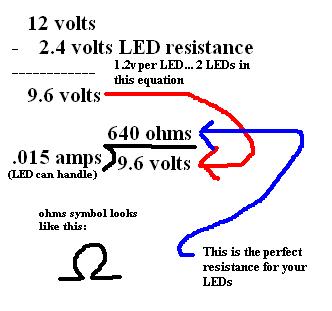
Now, lets consider how many LEDs you're going to run in this emblem... each LED cuts out about 1.2 volts in resistance, so lets say that you're going to be like me and put 2 LEDs in your emblem. That's 2.4 volts of resistance in the LEDs.
So, when we subtract that 2.4 volts from the original 12, that leaves us with 9.6 volts. Easy enough so far, right?
Next, we'll need to divide. We'll divide that 9.6 volts by 15 milliamps... that's 0.015 amps, or (to be more specific) the amount of power an LED can handle without risking burning out right away. So, 9.6 volts divided by 0.015 amps equals 640 ohms.
This means that 640 ohms would be the perfect resistance to run these 2 LEDs on a 12 volt power supply. Now, you're not always going to find the right value of resistor at your local Radio Shack, so you can go with a slightly lower resistance (which will allow more current, meaning a brighter LED but a shorter lifespan) or one with a higher resistance (less current, dimmer LEDs, longer lifespan). Take your choice.
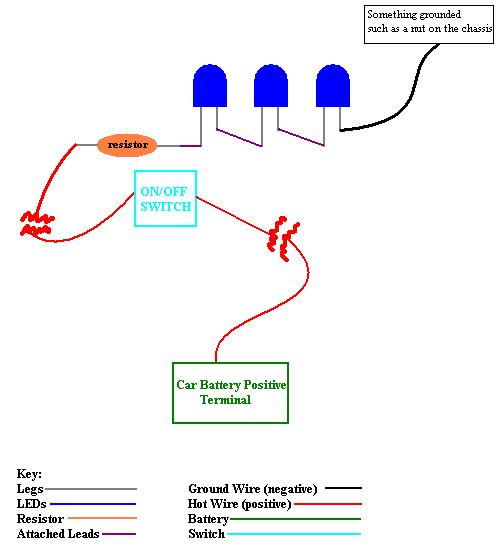
For those of you who need a visual (I know I would), here's a lovely picture for you, demonstrating my superior MS Paint skills
Now that you have the resistor you need (if you don't, go buy it right now, you'll need it for this next step), you'll need to do a little bit of wiring... people often do this with electrical tape, but do yourself a favor and use a soldering iron.
Wiring this thing is going to be really simple... ok, I'm mostly saying that so you don't get scared, but believe me, it's not hard and I could teach a 10-year-old to do it, although I don't know why I'd be letting a 10-year-old work on my car... but I digress, firstly, you'll need to wire your LEDs together... this is done simply enough. The LED should have 2 wires (we call the wires "legs" in the electronics world) coming out of it... one leg should be longer than the other, and the side with the shorter leg very often has a flat side. The long leg is positive and the short leg is negative.
Since one side of the LED is positive and one is negative, that means that the LED has "polarity". Resistors usually don't have polarity and can be wired in any which way and it doesn't matter. So, basically, you're going to want to wire the LEDs up so the negative on one LED goes into the positive on the next LED. Sounds kinda complicated, but there will be another MS Paint picture to follow as soon as I finish with the worded explaination.
On the end of the string of LEDs you've wired that is negative, you'll want to attach a wire that will go to ground... this wire can pretty much be wired anywhere that there's a screw attached to the chassis of the car, but don't hook it there just yet, only wire it to the LED. I suggest using Black wire for this (18AWG would probably be the best thickness) since black is usually just a good ground color. If you have an old Air-cooled VW that you're for some reason ruining with a glowing emblem, you might consider using brown as a ground wire since that tended to be their factory ground color... but once again, I digress...
Now, on the other end of the string of LEDs (the positive side) wire your resistor, and off of the other end of the resistor, attach a roll of wire... you're going to need a decent length, and since we don't know what the length is just yet, leave it attached to the roll... I suggest red 18 AWG wire for this one.
I promised you a picture, so here it is (of course, we haven't hooked up a switch or to the battery or to ground just yet):
Next, you need to mount your LED assembly to the Grille... on the 626, I used 5-minute epoxy and just glued it in place. On the Camry, I took out the screws holding the Toyota emblem to the grille, drilled holes through the lexan piece in the same spots as they were on the back of the Toyota emblem, and just put longer screws in to hold the lexan to the grille to the emblem.
At this point, replace the grille in the car. If you've done all this without taking the grille out, congratulations, but you're insane, and I have no idea how you did so.
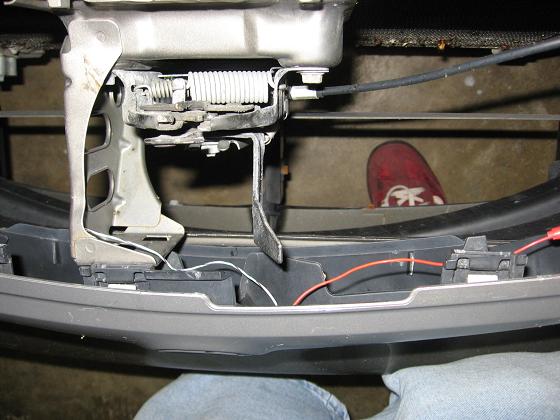
At this point, you can wire your ground wire to something on the chassis, like I said, I just used a screw near my hood latch. (note in this picture, my ground wire is the white wire with green and black stripes)
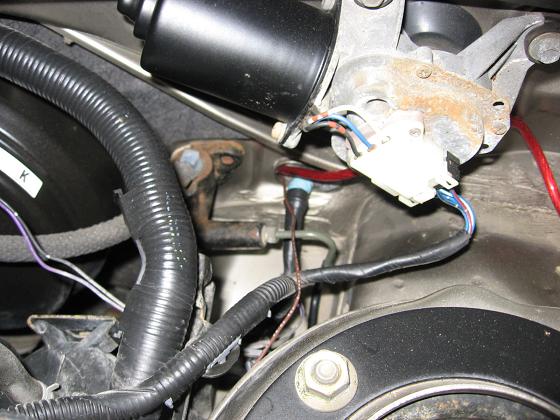
The red wire will need to be run out of harm's way (away from anthing hot or moving, I suggest behind the headlight and along the fender) where it will go through the firewall into the interior of the car (you'll have to cut the wire at this point to do so, but leave a couple feet of slack)... I ran my wire through where all the rest of the wires run through the firewall, rather than drilling a new hole. (again, note in this picture my hot wire through the firewall is brown. The thick red wire is for the subwoofers in my trunk)
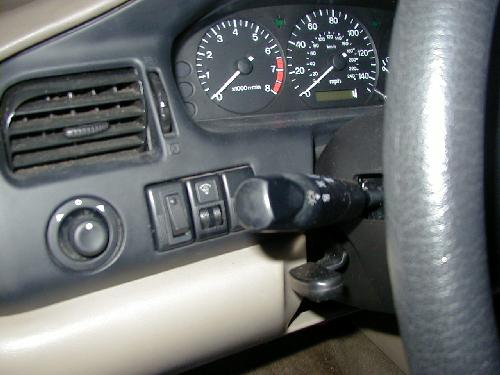
Once you find the wire inside the car, you'll have to wire it to one side of a switch. Where you place the switch is your choice really... I chose to mount mine on a blank switchplate next to my steering wheel... I also used a square switch, which required some milling to the switchplate, but I'll let you decide what to do as far as the switch is concerned.
Next, attach another (rather long) wire to the other side of the switch and run it back out through the firewall where you ran the first one in. This wire will need to be attached to the positive terminal of your car's battery... you can do this easily by stripping the end of the wire, loosening the nut that tightens the battery post clamp thingy, and tightening the nut again on the wire. Once again, this wire can't cross the negative battery terminal or be anywhere that it's going to get cut or melted or anything like that.
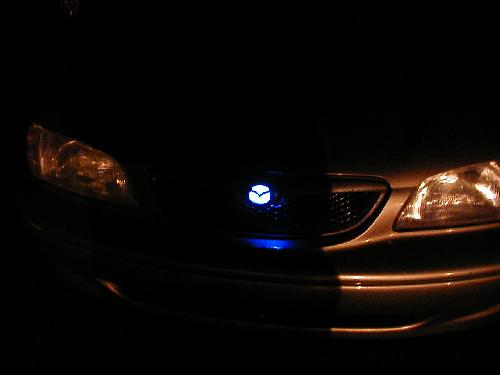
That's it! Now you should have an emblem that glows and makes all your friends jealous! If you happen to do this to your car, take some pictures and send them my way, I'd love to see them!
This site and all of its contents Copyright 2005 by Tim Phelan